


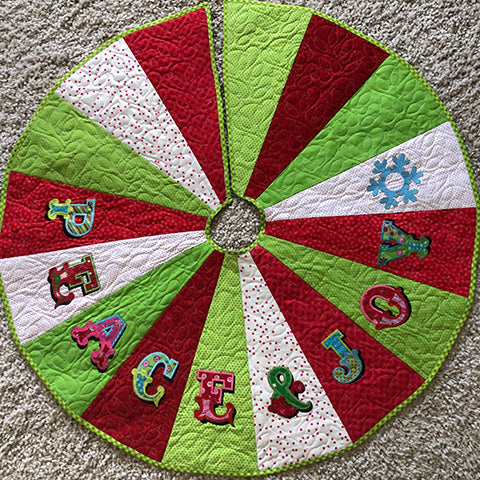
Lil'Elemenopea and June Tailor QAYG Christmas Tree Skirt
I had a booth across the aisle from Lori at June Tailor this summer at Bernina University. We got to talking and she showed me their new Quilt-As-You-Go patterns. I was most interested in using them to display my embroidery designs. The Christmas Tree Skirt caught my eye.

Here is how I added my Lil'Elemenopea letters to the
June Tailor Quilt-As-You-Go Christmas Tree Skirt:
June Tailor Quilt-As-You-Go Christmas Tree Skirt:
First of all, there are 16 panels. I decided on writing PEACE & JOY which is 9 letters. I decided to add a snowflake to make it an even 10 embroidered panels and that would leave 3 empty panels at the beginning before the lettering started and then three empty panels after the lettering and snowflake.
I picked 8 fabrics and cut two 9" x 22" panels out of each fabric. I backed each panel with ShapeFlex 101 - yes, it is a lot of Shapeflex and maybe you could simply put a square of ShapeFlex in back of the area you will be embroidering.
I measured up 5.5" from the bottom of each panel and drew a line with a washable blue marker. I also drew a vertical center line the length of the panel.
These are the lines I used to line up the letters as I embroidered them. (Follow instructions in my Lil'Elemenopea pattern for embroidery.)


Once embroidery was finished, I used the June Tailor template and lined up the bottom of the letter with the second line from the bottom of the template. I did my best to also use the vertical like I had drawn, but sometimes the letter had pulled one way or another and I first made sure the bottom of the letter lined up flush with the line on the template.


I traced around the template and then cut on the line I had drawn using a ruler and a rotary cutter. I repeated this step for each panel.


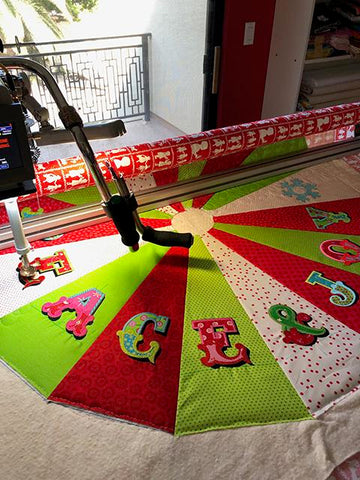
Once the panels were cut out, I loaded my backing fabric onto my long arm and basted the
Quilt-As-You-Go batting panel onto the backing. I then used a ruler to stitch and flip each panel down according to the June Tailor instructions while it was still on the long arm. This was much easier than I had expected. I did not iron as I went but you could do so.
After all the panels were stitched down, I basted around the outer edge, the inner edge and the edges of the 1st and 16th panels - these overlap a bit. I don't have exact instructions, just know that you will be cutting between the 1st and 16th panels after quilting and that you will be binding those edges anyway.
After all the panels were stitched down, I basted around the outer edge, the inner edge and the edges of the 1st and 16th panels - these overlap a bit. I don't have exact instructions, just know that you will be cutting between the 1st and 16th panels after quilting and that you will be binding those edges anyway.


After it is all quilted. Take it off the long arm, trim it down and bind. Be sure you cut your binding on the diagonal because you will be binding around curves!
Share this
Popular posts
Popular posts
Popular posts
